How to Start Vibe Coding: The Roadmap Nobody Gave You
The spec habit, the 80/20 wall, and the 5-project arc: everything before and after the install
Most vibe coding guides explain which tool to install. The real obstacle is different: most beginners quit somewhere between 80% done and shipped, stuck in an “almost works” loop with no framework for getting unstuck. This guide is the missing roadmap. The spec habit that makes projects actually finish. What the first session really looks like. Where the 80/20 wall comes from. The 5-project arc from first prompt to shipped system.

You’ve probably already looked at the tool list.
Maybe you’ve installed something.
Maybe you ran your first prompt and got back something that looked close but wasn’t quite right, and you weren’t sure what to do next.
Or maybe you haven’t started yet.
You’ve read three “beginner’s guides,” they all say the same thing (pick Cursor or Lovable, write clear prompts, iterate). You ran all 8 major tools on the same spec to see which actually holds up past the demo., and you still don’t know what the first real session is supposed to look like.
Either way, the thing missing isn’t a better tool recommendation. It’s the map.
Vibe coding has a shape. There’s a place where the first session breaks and that’s normal. There’s a wall that comes at roughly 80% of every first build. Almost every beginner hits it, almost none of them know it’s coming. There’s a progression of builds where each one teaches you something the next one requires. And there’s a minimum you actually need to bring to this, narrower and more specific than most guides admit.
I went from ChatGPT to Cursor to Claude Code over eight months before I understood that shape. Not because the tools were confusing. Because nobody told me what the road looked like.
This is that map.
What you’ll go through with me:
Write the Spec First — the one habit that separates finished builds from abandoned ones
Which Tool to Start With — the fastest decision, not a comparison article
Your First Session — what the first 30–60 minutes actually look like
The 80/20 Wall — it’s coming; what it is and the two moves to get through it
The 5-Project Arc — what each stage of the progression actually teaches
The Minimum You Actually Need — not “no code required” and not “learn to code first”
🎁 12 Claude Code Projects Cheat Sheet — all 12 projects with the exact first prompt for each. Free at the end.
Hi, I’m Jenny 👋
I believe anyone can thrive with AI, not by mastering the tools, but by building real things with them. I run Build to Launch and the Practical AI Builder program, where we go from experimenting to shipping. Come build with us.
If you’re new to Build to Launch, welcome! Here’s what you might enjoy:
How to Make Vibe Coding Production-Ready — when your build works locally and you want to ship it
15 Claude Code Projects From 30-Minute Wins to a System That Runs Itself — the full progression with every first prompt

Write the Spec First
Before you open any AI tool, before you install anything, before you type the first prompt: answer three questions in plain sentences:
Who is using this? Not “everyone.” One person. Usually you.
What’s the one thing it needs to do? Not all the features you want eventually. The single core action.
What does success look like? Not “it works.” Specifically: when I do X, the tool does Y in Z format.
That’s the spec. It takes five minutes. It changes everything.
I learned this the hard way. My second real vibe coding project: I typed “Build me a daily AI digest app” and got back something that ran. It fetched content. It generated summaries. It looked like 80% of what I wanted.
Then I looked closer. No deduplication. The same article appeared five times. The database schema was wrong for what I actually needed. Error handling was missing. The app ran, but it didn’t do the thing I wanted it to do, because I hadn’t defined what that thing was.
The problem wasn’t that Claude Code generated bad code. I hadn’t given it enough direction. And Claude had filled in every gap I left with its best guess.
That’s what AI does. It fills gaps. Your spec is how you close the gaps before they become problems.

What a spec actually looks like
Not a document. Not a requirements list. Just answers to the three questions, in writing, before you start.
For a personal time tracker:
Who: just me. One action: log what I’m working on and how long. Done: when I type “report,” I see today’s hours by project.
For an invoice generator:
Who: me, for clients. One action: create a PDF invoice from client name, project, hours, and rate. Done: PDF saves locally and a record goes into a database.
That’s it. Two sentences each. Claude Code now knows what it’s building toward.
For projects you’ll work on across multiple sessions, that spec becomes a CLAUDE.md file at the root of your project folder. Claude Code reads it automatically at the start of every session. No re-explaining. No context collapse.
# My Invoice Generator

A CLI tool that creates PDF invoices and logs them to a SQLite database.

## What's working
- Invoice creation from command line input
- PDF generation
- SQLite database logging

## In progress
- Email delivery of generated invoices

## Don't change
- The database schema (clients + invoices tables) — stable
- The PDF template — customized, don't touch
You don’t need this for a first project. But when you’re on session four of the same build and Claude starts making suggestions that contradict what you already have, this file is why you don’t lose your mind.
Define done before you start. Everything else follows.
Which Tool to Start With
Two decisions. Everything else can wait.
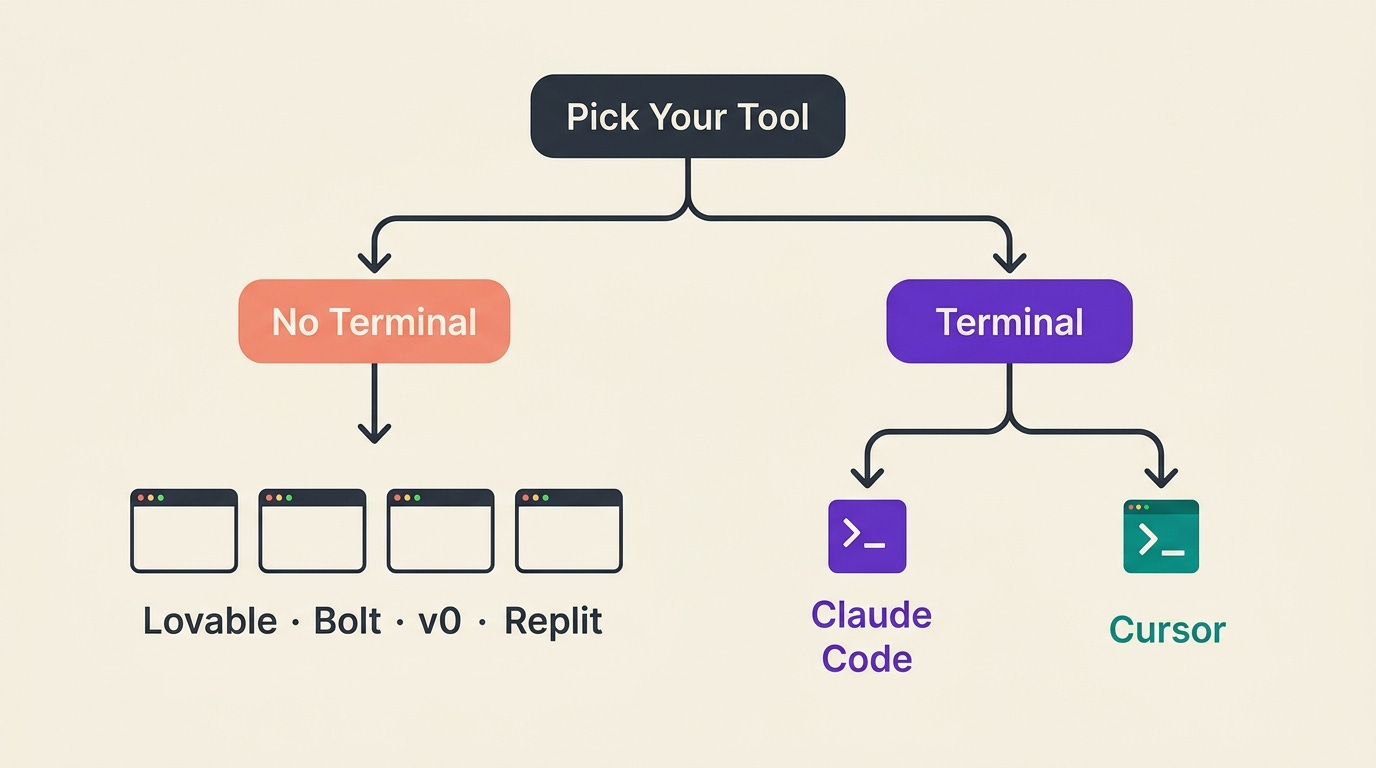
Decision 1: Terminal or no terminal?
No terminal: Start with a browser builder. Lovable, Bolt, v0, Replit, and Base44 all have free tiers. You sign up, describe what you want, and it builds something in a browser window. No install, no command line, nothing to set up.
The ceiling is real. Browser builders are fast for UI prototypes and simple apps. Once you want something that does real work (connects to external data, runs on a schedule, handles complex logic), you’ll hit limits faster than you expect. But for a first project or a visual prototype, they work fine.
Terminal: Start with Claude Code. It costs $20 a month via Claude Pro. You’ll need a terminal. The trade-off: Claude Code has full file system access. It reads and writes your actual project files, installs dependencies, runs commands, and maintains context across a whole project. That’s what makes Tier 2 and Tier 3 builds possible.
Decision 2: Claude Code or Cursor?
Cursor is VS Code with AI built in. It’s excellent if you already work in a code editor and have some development background. The AI suggestions are powerful if you can evaluate them.
Claude Code is what you want if you’re building from scratch without a dev background. The terminal interface is less familiar, but the capability gap is real for non-technical builders.
If you’re not sure which describes you: if you’ve never opened VS Code in your life, start with Claude Code.
How to install Claude Code
Mac or Linux:
curl -fsSL https://claude.ai/install.sh | bash
Windows (PowerShell):
irm https://claude.ai/install.ps1 | iex
Mac with Homebrew:
brew install --cask claude-code
After install, run claude --version to confirm it worked. Then run claude to start. It’ll open a browser window to authenticate with your Claude account. Log in, approve, return to the terminal. You’re in.
If claude gives “command not found” after install: close the terminal, open a new one. The install updates your PATH, but only in new sessions.
For the full walkthrough with screenshots for every step, Claude Code for Everyone has the complete install guide plus a first project.
I tested Claude Code against seven other tools on the same build, ran all of them through the same spec, and scored each one. The rankings weren’t what I expected.
One rule: pick one tool and stay with it for three projects. Tool-switching before you understand any tool is how you end up knowing a lot about tools and shipping nothing.
One tool. Three projects. Everything else can wait.
Your First Session — What Actually Happens
The mental model most beginners bring to vibe coding: the vending machine.
Put in the request, get the working thing. When the thing doesn’t work, conclude either the AI is broken or you’re doing something wrong.
That model is wrong. And it costs months if you carry it into every session.
Claude Code is more like working with a capable contractor. A contractor who can build anything you describe — but needs you to describe what “done” looks like, flag what matters most, and tell them specifically what isn’t working. The output quality tracks directly to the quality of your direction.
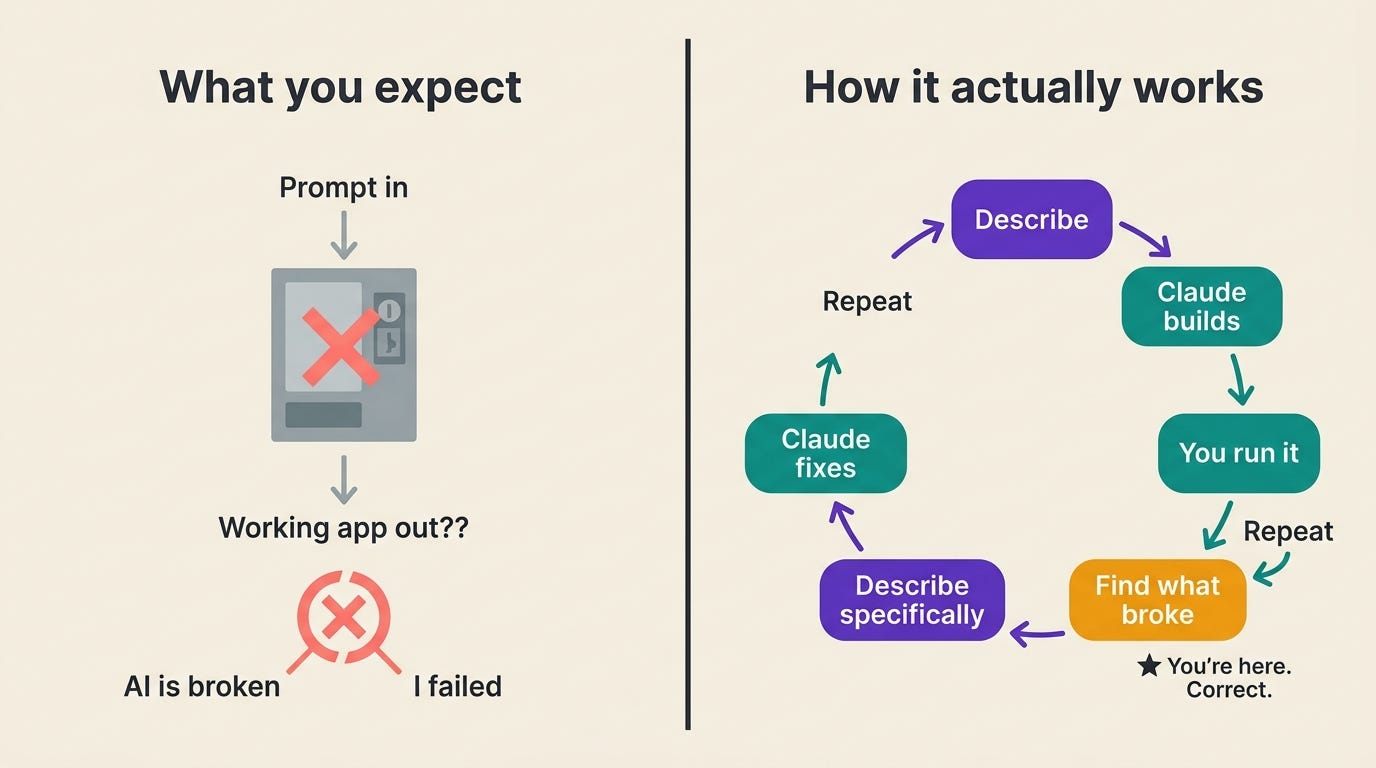
The real feedback loop
This is the loop. Every vibe coding session is some version of this:
Describe what you want to build, using your spec
Claude builds something
You run it
You find what broke or didn’t behave as expected
You describe the specific problem to Claude
Claude fixes it
Back to step 3
Most beginners give up at step 4. They’ve run the thing, it doesn’t work right, and they conclude they’ve failed.
They haven’t. Step 4 is exactly where they should be. That’s the loop working.
“Implementation complete” is not done
Claude will tell you “implementation complete” when half the functions have TODO comments. It will tell you a feature is “working” when it works in the specific case it tested, not in the four cases you actually care about.
This isn’t a bug. It’s how AI coding agents work. They generate to a point that seems complete from their context. Your job is to run the thing yourself, find the edge cases, and report back with specifics.
“It doesn’t work” is not useful feedback.
“When I click Submit with an empty field, the page crashes instead of showing an error message” is useful feedback.
The shift from the first to the second is the core skill. Not syntax. Not computer science. The ability to describe a specific broken behavior. (The complete prompting guide maps this principle across every major vibe coding tool, if you want the full framework.)
The first session
Budget 30 to 60 minutes. Use your spec from the previous section. The first session usually looks like this:
You describe the project (the spec)
Claude builds a first version, faster than you expected
You run it and find something that doesn’t work
You describe the problem specifically
Claude fixes it, sometimes introducing a different problem
You find that problem
You fix that
Somewhere in here, something works. Not everything. Something. That’s progress.
The magic people describe in vibe coding isn’t the first prompt working perfectly. It’s the compound effect of the loop running. First session you complete two or three iterations. Three sessions in, you’re running ten. Six projects in, you’ve developed a feel for what to spec, what to test first, and how to describe problems in a way Claude fixes on the first try.
The first session is debugging. That’s not a bad sign. That’s where it starts.
Most beginners give up at step 4. Step 4 is exactly where they should be.
The 80/20 Wall
It’s coming. Probably at project 1 or 2.
The 80/20 wall is the moment when AI has gotten you to roughly 80% of a working build, and the last 20% stalls. That last 20%: edge cases, authentication, deployment, integrations, the things that make it actually work in the real world. Exactly the stuff the tools promised you could skip.
It didn’t lie. You can skip writing the code. You cannot skip defining what the code should do.
There are two types of stuck, and they need different moves.
The almost-works loop
What it looks like: The app runs but does something slightly wrong. You describe the problem. Claude fixes one thing and breaks another. You describe that problem. Claude fixes it and something else breaks. After an hour, you’re at the same 80%, and you’re starting to wonder if you’re making it worse.
This is the most demoralizing kind of stuck, because “almost works” keeps pulling you forward. It feels like you’re one fix away. Often you’re not.
What to do: Stop prompting.
Open the spec you wrote at the beginning. Find the one thing that’s actually broken. Not all the things. The one most important thing. Describe it with maximum specificity.
Not: “The form still isn’t working.”
Instead: “When I submit the form with a valid email address, I get a 500 error. The console shows: [paste exact error text]. The submit button handler is in app.js line 47.”
Specificity is the move. Every word you add to the problem description is a word Claude doesn’t have to guess at.
The context collapse
What it looks like: You’ve been working on a project for several sessions. Claude starts making changes that contradict things you built earlier. It suggests rewriting a function that was working. It seems to have forgotten what you decided.
It hasn’t forgotten. It never remembered in the way a human collaborator would. The context window fills up over long sessions, and earlier parts of the conversation drop out.
What to do: Start a new session. At the top, paste your CLAUDE.md or write a one-paragraph summary of where you are:
“I have a Python script that does X. I’ve already built Y and Z, and they’re working correctly. The problem I’m trying to fix right now is...”
That one paragraph resets the context. Claude now knows what exists and what the specific problem is.
The structural fix: if you’re working on something across multiple sessions, the CLAUDE.md file from the previous section is not optional. It’s what keeps session four coherent with session one.
Before you decide a build is done, run it against every case you care about, not just the happy path. Smoke testing for vibe coders is the fastest way to find the 20% before you ship.
The 80/20 wall is not a failure state. It’s where the project gets real. Every builder you know who ships things has been stuck here. They’re still stuck here sometimes. The difference is they’ve learned the two moves and they don’t spiral.
The 5-Project Arc
Getting through the wall once is luck. Getting through it five times is a system. That’s what the progression is for.
Not a list of ideas. A learning progression.
The order matters because each build teaches something the next one requires.
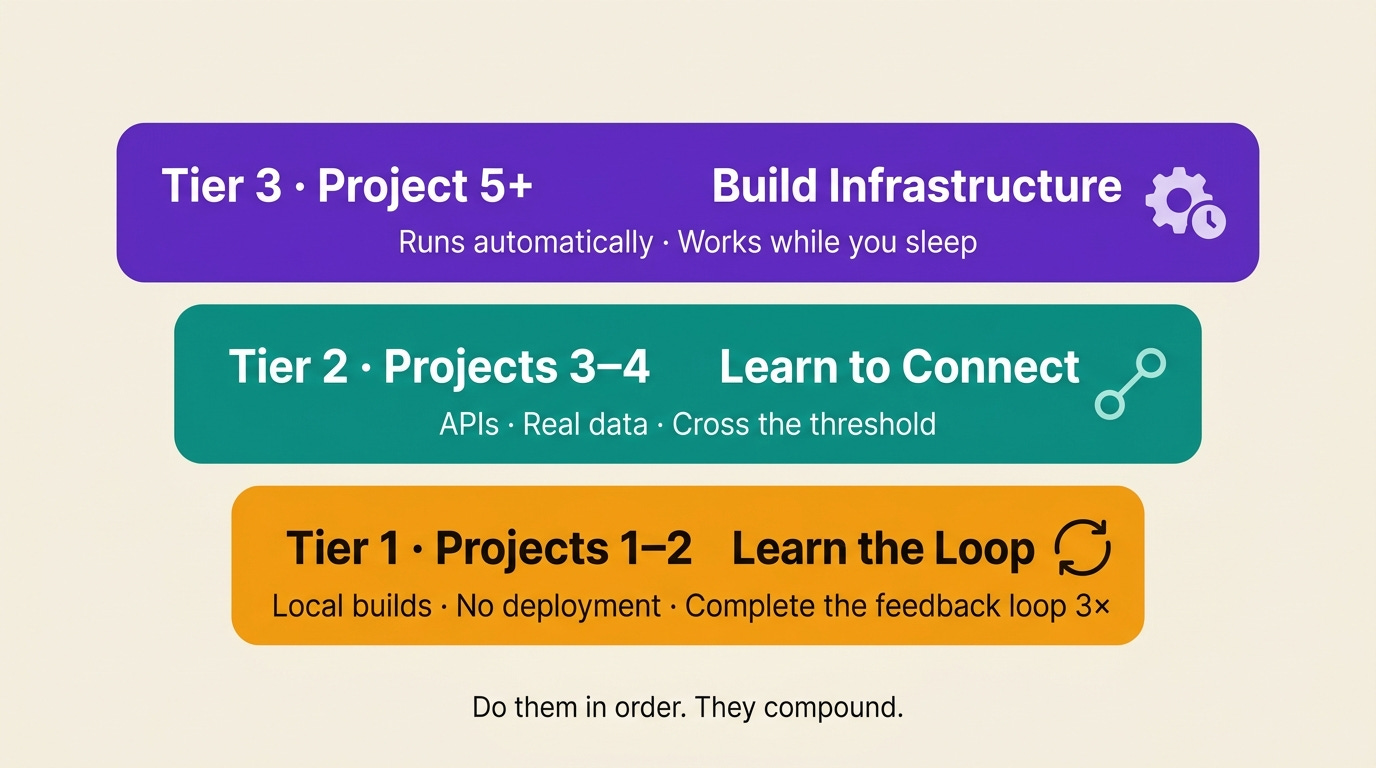
Tier 1 — Learn the loop (projects 1–2)
Local builds. No deployment. No APIs. Nothing that requires an account somewhere or a credit card.
The single goal of Tier 1: complete the feedback loop three times without abandoning it. Describe, build, run, find what broke, describe the problem, fix it. Do that loop three times on one project. That’s it.
Project 1: Personal time tracker
Build a command-line tool that logs what I'm working on with a start/stop timer.
Store everything in a CSV file. Show today's total time by project when I type "report".
What this teaches: how to describe something specifically enough that it gets built, and how to give useful feedback when something breaks.
Project 2: File organizer
Write a Python script that looks at my Downloads folder and moves files into
subfolders by type: Images, PDFs, Spreadsheets, Other. Ask me before moving anything.
What this teaches: handling real file system state. Your Downloads folder is messier than any test case Claude wrote. The script will break on something unexpected. That’s the lesson: how to describe what broke and get it fixed.
After two Tier 1 builds, you’ve completed the loop enough times that it starts to feel like a method, not an accident.
Tier 2 — Learn to connect (projects 3–4)
These builds talk to the outside world: APIs, databases, real data sources. The builds themselves matter less than the threshold you cross.
Once you’ve connected Claude Code to a real data source (Gmail, a database, a live API), it stops being a script tool. It becomes infrastructure. That shift changes what you think is possible.
Project 3: Email triage bot
Build a script that reads my Gmail inbox, summarizes unread emails from the
last 24 hours, and flags anything that looks like it needs a reply.
Use the Gmail API.
This requires Gmail API credentials (free, takes about 10 minutes to set up). Claude Code walks you through the setup. Or if you have the Gmail MCP connected, Claude can read your inbox directly without a separate script.
What this teaches: working with an external API, handling authentication, and dealing with real data that doesn’t behave like test data.
Project 4: Research aggregator
Build a tool that takes a list of URLs, fetches the content from each,
summarizes each one in 3 sentences, and outputs a structured markdown report.
What this teaches: prompt chaining. The script calls Claude multiple times, once per URL, and you start to see how to build multi-step workflows, not just single-prompt scripts.
Tier 3 — Build infrastructure (project 5+)
Not a tool. Not an app. Something that runs on a schedule and does work while you sleep.
The difference between a project and a system: a project runs when you run it. A system runs automatically, watches for changes, and takes action without you.
My content engine is a Tier 3 system. It runs weekly research digests, pulls GSC data, generates article briefs, and commits everything to the repo, automatically, on a schedule. I built it entirely through vibe coding. It’s not impressive code. It’s useful infrastructure.
You don’t reach Tier 3 on project 2. But every build in Tier 1 and Tier 2 is teaching you the skills that make Tier 3 possible: how to spec a system, how to handle failures, how to think in terms of inputs and outputs rather than buttons and screens.
Project 1 teaches you the loop. Project 5 surprises you.
For Tier 2 and 3 projects, MCP servers are what connect Claude Code to real data: Gmail, databases, APIs, Slack, and more. The Best MCP Servers for Claude Code guide covers which ones are worth installing and how, with one-line installs for each.
The full deep dive on all 12 projects walks through every build with more context, the decision points at each stage, and the exact prompts for all the steps after the first one.
🎁 The 12 Claude Code Project Ideas Cheat Sheet is free — all 12 projects on 2 pages with the first prompt for each. Grab it before you start.
What Breaks in Week One (And How to Recover)
Every vibe coder hits these four patterns. Knowing what they look like in advance means you recover faster.
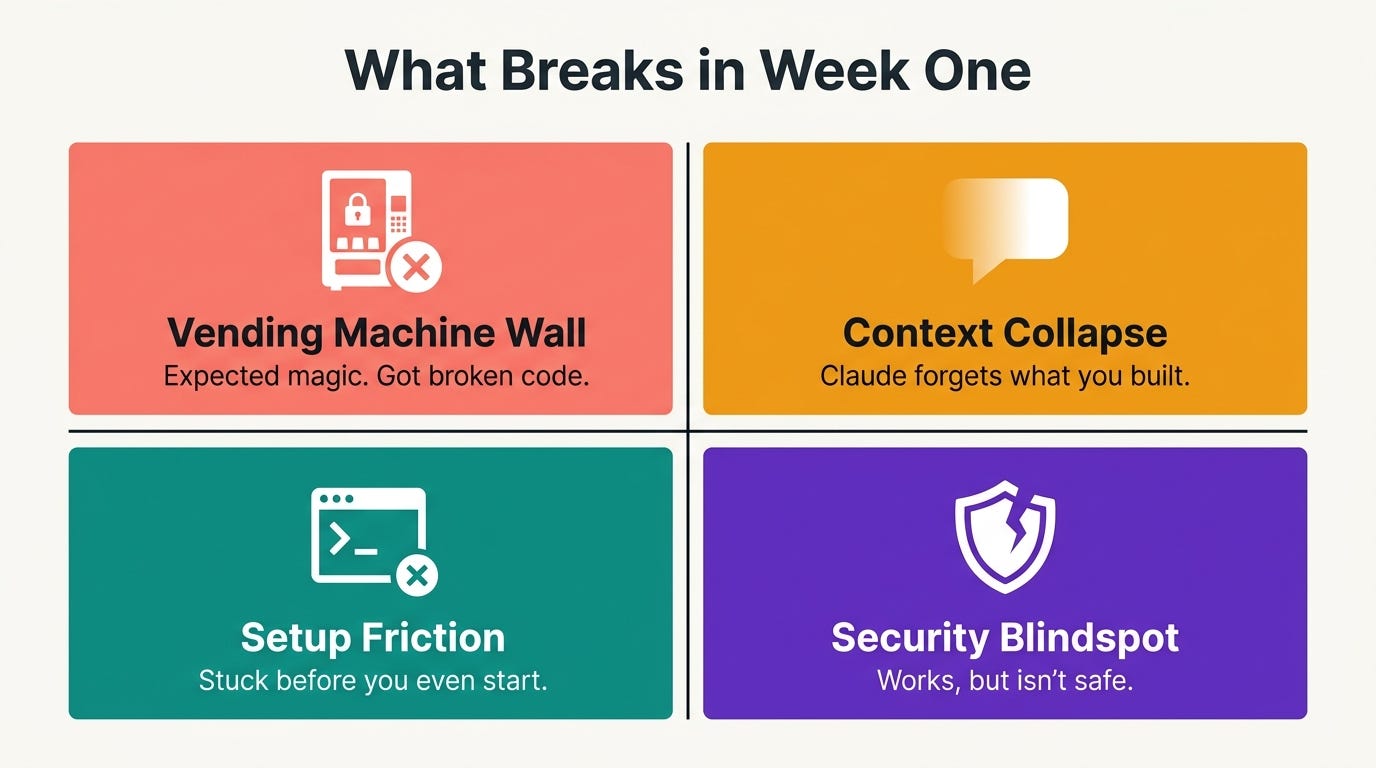
Pattern 1: The vending machine wall
What it looks like:
You give Claude a broad request. It builds something.
You try to run it and it doesn’t work, or it works but does the wrong thing.
You don’t know what to say next.
What to do:
Narrow the next request. Don’t say “fix it.” Say specifically what broke: “When I run the script, I get this error: [paste error]. The error happens at the CSV writing step.” The more specific you are, the faster Claude fixes it. Specificity is the skill.
Pattern 2: The context collapse
What it looks like:
You’ve been working on a project for a few hours. Claude starts making changes that break things you built earlier. It seems to have forgotten what you already did.
What to do:
Claude Code has a context window. It can only hold so much conversation history before earlier parts fall out of reach. When a session gets long, start a new session and re-describe the project state: “I have a Python script that does X. I’ve already built Y and Z. The problem I’m trying to fix now is...”
The better long-term fix: put your project description in a CLAUDE.md file at the root of your project folder. Claude Code reads this automatically at the start of every session. I cover how to set this up in the prompting section below.
Pattern 3: Setup friction (the terminal wall)
What it looks like:
You can’t get past the install step. Something fails silently, or you get an error you don’t understand, and you’re not sure whether to keep trying or start over.
What to do:
Paste the exact error message into a new Claude conversation (not your project session) and say: “I’m trying to install Claude Code on [Mac/Windows/Linux] and got this error. What does it mean and how do I fix it?” Claude is very good at diagnosing install errors. This is one of the few cases where using Claude for troubleshooting before trying anything else saves time.
Pattern 4: The security blindspot
What it looks like:
Claude builds something that works. You ship it. Later you realize it stored passwords in plaintext, or exposed an API key in the code, or had no input validation on a form that accepts user data.
I built an image finder app and didn’t catch until much later that it was storing user passwords without hashing them. I only caught it because I already knew that was wrong. Most beginners don’t have that backstop.
AI-generated code passes security review only 10.5% of the time on its own. Not an argument against vibe coding. An argument for knowing what to ask.
What to do:
After each build, paste this into Claude: “Review this code for security issues. Focus on: how credentials and passwords are stored, whether any secrets are hardcoded, whether user input is validated before being used, and whether file paths are sanitized.” You don’t need to understand the fixes. Ask Claude to explain each issue it finds and fix it.
For everything that happens after you fix these patterns and want to actually ship what you built, How to Make Vibe Coding Production-Ready covers the 90% of the work that isn’t writing the first draft.
The Minimum You Actually Need
Two wrong answers exist in the vibe coding ecosystem.
“No coding required” — technically true, practically misleading. It sets up the vending machine mental model: put in the request, get the working product. Then when the product doesn’t work, you conclude you did something wrong.
“Learn to code first” — discouraging and unnecessary. The old learning path. Eight months of courses before you’ve shipped a single thing.
The real answer is narrower and more specific.
What you actually need
1. Enough to read an error message
Not to fix it yourself. Just to describe it accurately.
When something breaks, Claude Code prints an error. Copy the entire error. Paste it into the conversation. Say what you were doing when it happened. That’s it. Claude Code is excellent at diagnosing errors when given the full text.
The skill: don’t paraphrase the error. Don’t say “it gave an error about something.” Paste the exact text. The specific error message is the most useful thing you can give Claude.
2. Enough to recognize when something is broken
Open the thing. Click the buttons. Try to do the thing it’s supposed to do. Does it do the thing? Does it do something unexpected? Does it crash?
Describe what you observed. Not your interpretation. What you observed.
3. One security habit
AI-generated code passes security review only 10.5% of the time on its own. That’s not an argument against vibe coding. It’s an argument for knowing what to ask.
I built an image finder app that stored user passwords in plaintext. I caught it because I already knew that was wrong. Most beginners don’t have that backstop.
Before you share anything you’ve built with another person, or put it on a server:
Review this code for security issues. Focus on: how credentials and passwords
are stored, whether any secrets are hardcoded in the code, whether user input
is validated before being processed, and whether file paths are sanitized.
You don’t need to understand the fixes. Ask Claude to explain each issue it finds and fix it. That audit takes five minutes. Skipping it is how you put real people’s data at risk.
The skill is describing a problem accurately. Everything else Claude handles.
Next Steps
Not started yet
Write your spec right now. Three questions, five minutes: who, what one action, what does done look like. Then open Claude Code or a browser builder and run it.
Don’t pick the perfect project. Pick a project you actually need. The best first build is a tool that solves a problem you have today.
The Substack Niche Analyzer started that way — I was doing the research manually for every post. After the tenth time, I built the tool. The full build log shows exactly how that goes from a personal script to a deployed app.
Built one or two things, want to go further
Move to Tier 2. The email triage bot (Project 3) is the one most people report changes their daily workflow. Pick one Tier 2 build this week.
And if you’ve been on the same build for two weeks without shipping: strip it back. Find the one feature that works and ship that. You can add the rest later.
Once you do ship — 7 things nobody warns you about launching your first vibe-coded app.
Shipping regularly, want to go deeper
Tier 3 is a different kind of challenge. A system that runs without you isn’t a project you finish. It’s infrastructure you maintain. The planning discipline is different. Read the production-ready guide before you start that build.
And if you just shipped your first one — what actually comes after launch is the honest debrief.
If any of this is useful, share it with someone who’s been meaning to start but hasn’t.
Frequently Asked Questions
Do I need to know how to code to vibe code?
No. You need to describe what you want clearly and recognize when something isn’t working. Both are learnable through the builds. The Tier 1 projects are designed so you don’t need coding knowledge to run them.
Which tool should I start with — Claude Code, Cursor, or Lovable?
Start with Claude Code if you want to build tools that run and do things (scripts, automations, pipelines). Start with Lovable if you want a visual UI quickly and don’t want to touch a terminal. Cursor is best if you already work in VS Code. Most builders reading this guide should start with Claude Code.
What should my first vibe coding project be?
Something you actually need. Not a tutorial project, not someone else’s app idea. Something that would save you real time if it worked. The time tracker (Project 1) is the default recommendation because almost everyone has the problem it solves and it’s achievable in one session.
Why does Claude say it’s done when it’s not working?
Claude evaluates completion from its own context, not from running the code against your real use cases. “Implementation complete” means Claude thinks it addressed the requirements as it understood them. Your job is to run it and report what’s actually broken. That’s step 4 of the loop. Not a failure. The loop working.
How do I know if my build is secure enough to share?
After every build, before sharing: paste the security audit prompt from the last section. Claude will flag issues and fix them. Do it before the first person who isn’t you touches the thing.
If you’re turning your expertise into products, building with AI, or helping others do the same, you belong here. If you find this post so useful, consider upgrade and join the Practical AI Builder Program, you’ll learn much more from there.
What's the first thing you'd spec out right now — one user, one action, one definition of done?
— Jenny
Why Upgrade · Practical AI Builder Program · Templates · Builder Showcase