Build a Substack Niche Analyzer With Python and Cursor: The App That Started as My Own Research Tool
How to build a Substack niche analyzer with Python and Cursor. Includes the Vercel API bug that broke it on deploy, and how to fix it.
Want to build a tool that analyzes Substack newsletters by keyword, shows subscriber distribution, and surfaces the top performers in any niche? This is the full build log — Python, Next.js, Cursor, real Substack API endpoints, and the deployment bug that broke everything on Vercel before a database-first approach fixed it.

The niche research I ran on 1,200 newsletters (covered in How to Research Substack Niche Competition With AI) gave me data. But it didn’t give me a tool anyone else could run.
Every time someone dropped a comment asking how to research their own niche, I had to explain the manual process. After the tenth request, the answer was obvious: build the app.
The goal wasn’t a product. It was a personal research tool that happened to be shareable.
Hi, I’m Jenny 👋
I build AI systems and teach non-technical people to ship with them. If you’re past the “what is AI” stage and trying to build real things with it, the Practical AI Builder program is where I work with builders directly.
New here? Start with these:

What’s inside:
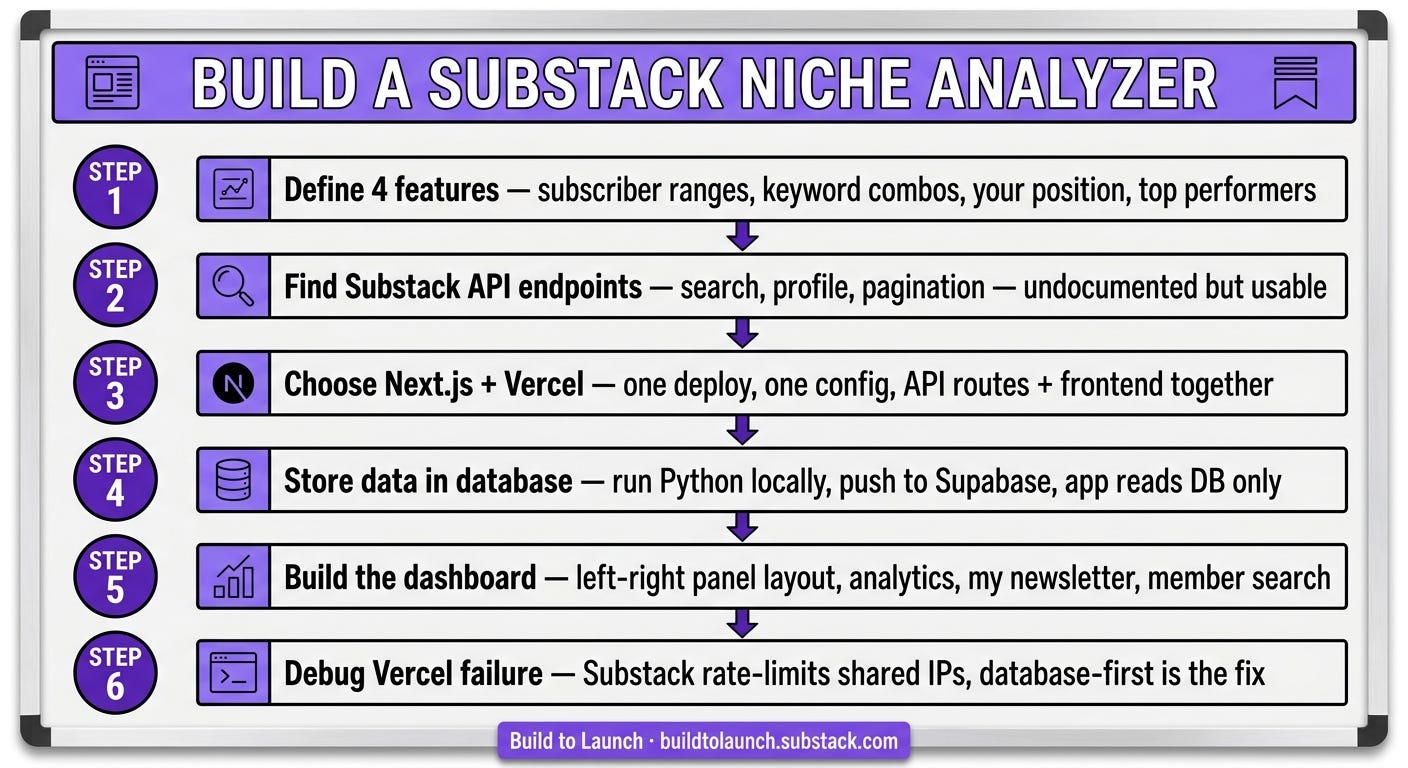
Step 1: Define what the tool needs to do: the 4 features that shaped the entire architecture
Step 2: Find the Substack API endpoints: how I got the endpoints and what they actually return
Step 3: Choose the stack: why Next.js + Vercel won over the backend/frontend split I’d been avoiding
Step 4: Store the data locally — don’t query live: the architectural decision that made the whole thing reliable
Step 5: Build the dashboard: the left-right panel layout, union/intersection search, and tier data
Step 6: Debug the Vercel deployment failure: the API that worked locally and broke on deploy
The app
The Substack Niche Analyzer is a dashboard that lets you type in a keyword, see how many newsletters cover that space, where they sit in Substack’s tier system, who the top performers are, and how your own newsletter compares. It pulls data from Substack’s API, stores it in a database, and serves it through a Next.js interface.

I built this in early 2025 with Cursor, starting from my own niche research project. The original research took an evening of manual work and Claude prompts. This app makes the same analysis available from a search bar.
What you need
Python (for data collection scripts)
Cursor (or Claude Code — both work for this build)
Next.js + Vercel account (free tier is enough to start)
A database — I used Supabase (free tier)
Basic familiarity with API calls and JSON
Step 1: Define What the Tool Needs to Do
Before writing a line of code, I listed the 4 things I actually needed the tool to do. Not the 40 things it could do — the 4 it had to do to be useful for my own research. If you’re unsure whether your own tool idea is worth building, this validation framework is how I check before I commit to a build.
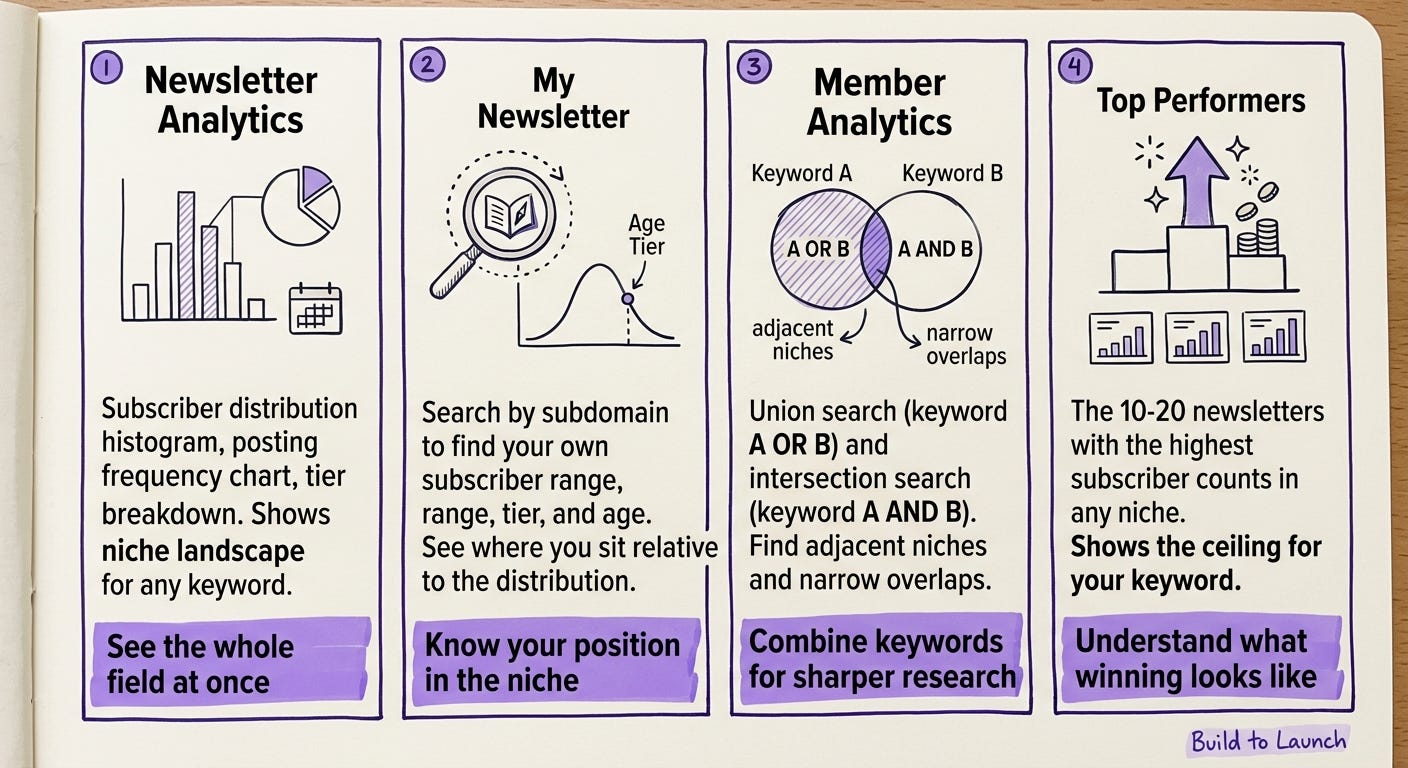
Display metrics that matter for niche research — subscriber ranges, posting frequency, Substack tier distribution. Not vanity stats.
Support keyword combinations — union search (newsletters matching keyword A OR keyword B) and intersection search (newsletters matching A AND B). Single-keyword searches give a skewed picture.
Show my own newsletter’s position — where does Build to Launch actually sit relative to everything in the analysis?
Surface top performers — the 10-20 newsletters with the highest subscriber counts in the niche, so I could understand the ceiling.
This list became the feature spec. Every build decision traced back to it.
With Cursor (2025): I prompted the feature spec directly into Cursor and let it scaffold the initial Next.js pages around those four views.
With Claude Code today: The same approach but faster — you can write the feature spec into CLAUDE.md and Claude Code will reference it throughout the build without you re-explaining the goals in every session. The Practical AI Builder program covers how to structure these project context files for any app build.
Step 2: Find the Substack API Endpoints
Substack doesn’t publish an official API. There’s no documentation page, no developer portal.
I asked Claude: “What are the Substack API endpoints for searching newsletters and getting newsletter data?”
It gave me the endpoints. They weren’t secret — they’re the same endpoints the Substack web app uses internally. The key ones for this build:
Newsletter search:
https://substack.com/api/v1/search?query={keyword}&type=publicationNewsletter profile:
https://substack.com/api/v1/pub/{subdomain}/subscribers(returns tier and subscriber range)Top newsletters by keyword: pagination via offset + limit parameters on the search endpoint
The response format is JSON. Each newsletter object includes the subdomain, subscriber count range (not exact), tier, creation date, and whether paid subscriptions are enabled.
One thing to know upfront: Substack’s keyword indexing is inconsistent. Some keywords return zero results even when there are clearly newsletters in that space. This isn’t a bug in your code — it’s how Substack indexes publications internally. Short keywords and very new keywords are the worst offenders.
For the mcp-substack-notes-research-agent I built later, I ran into the same indexing quirk at a larger scale — 3,000 notes, same issue with certain creator handles returning empty results.
Step 3: Choose the Stack
Previous apps I’d built used separate backend and frontend hosting — which either forced me to combine them in awkward ways or maintain two deploy targets. I wanted one deploy, one config, one place to push.
Next.js + Vercel solved this. API routes live alongside the frontend. One git push deploys everything. No separate backend server.
The decision:
Frontend: Next.js (React)
Hosting: Vercel (free tier)
Database: Supabase (PostgreSQL, free tier)
Data collection: Python scripts (run locally, push to Supabase)
AI assistance: Cursor for UI components, Claude for data transformation logic
This was the first project where I felt the stack choice genuinely reduce friction rather than add it. Previous projects I’d either over-engineered (separate services) or under-engineered (everything in one Flask file). Next.js hit the middle. For what choosing the right stack looks like in practice, How to Build an AI App From Zero to Launch covers the same decision process from a different angle.
Step 4: Store the Data Locally — Don’t Query Live
This is the architectural decision that made everything else work.
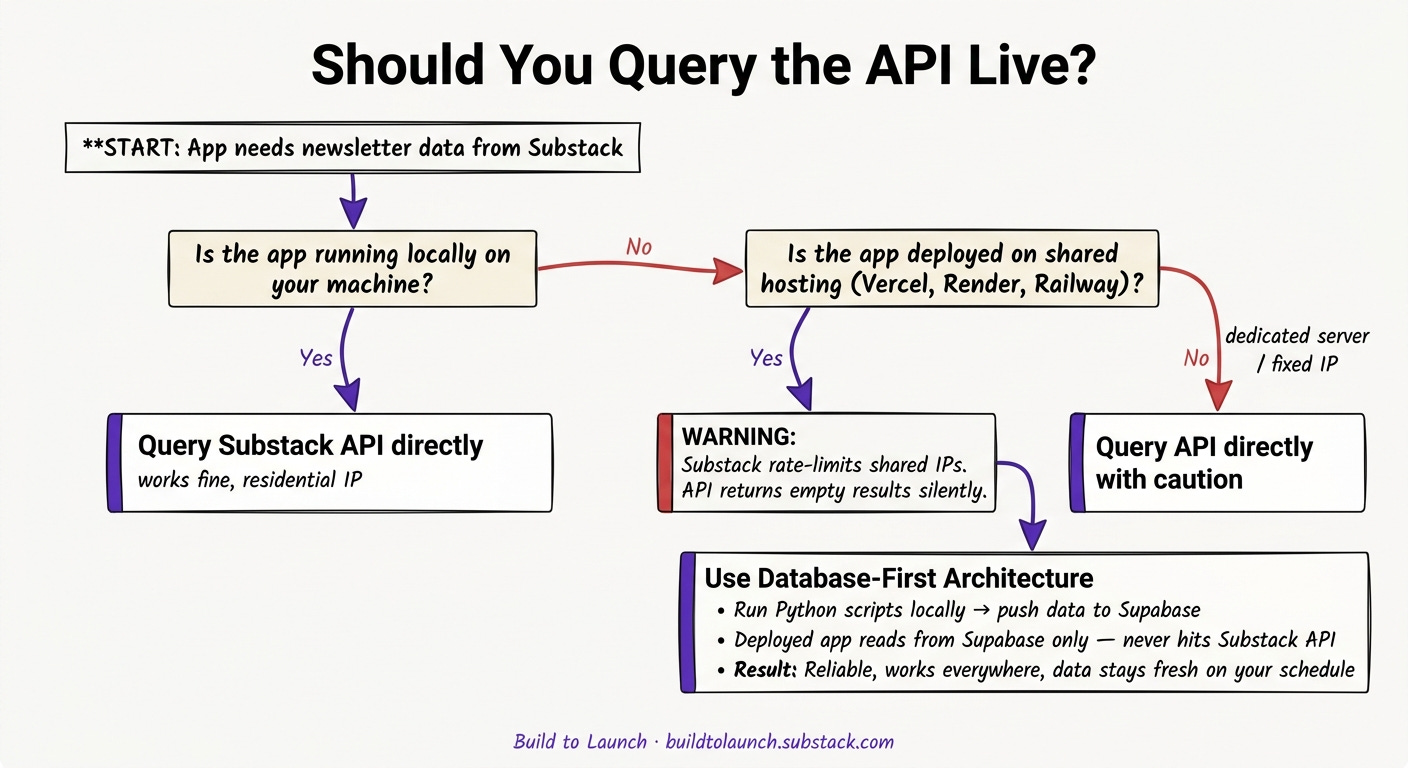
My first instinct was to query the Substack API on demand — user types a keyword, app hits the API, returns results. Clean, real-time, simple.
It broke almost immediately in testing. Substack applies rate limits on API requests from deployed apps. Local development works fine because the requests come from a residential IP. Vercel’s shared infrastructure gets throttled.
The fix: don’t query the API from the deployed app at all. Instead:
Run Python scripts locally to collect newsletter data for each keyword
Store results in Supabase (cloud database, accessible from Vercel)
The deployed app reads from Supabase — never touches the Substack API
This trades real-time data for reliability. For niche research, that’s the right trade. You don’t need subscriber counts updated by the minute — you need them accurate and accessible.
The data engineering mindset behind this decision is the same one I use for every data-heavy project now: decouple collection from serving. They’re different problems, they have different failure modes, and mixing them creates both.
Python collection script (simplified):
import requests
import json

def fetch_newsletters(keyword, limit=400):
    results = []
    offset = 0
    while len(results) < limit:
        url = f"https://substack.com/api/v1/search?query={keyword}&type=publication&offset={offset}&limit=50"
        response = requests.get(url)
        data = response.json()
        publications = data.get('publications', [])
        if not publications:
            break
        results.extend(publications)
        offset += 50
    return results[:limit]

# Run locally, save to Supabase
newsletters = fetch_newsletters("AI building")
# then upsert to your database
Step 5: Build the Dashboard
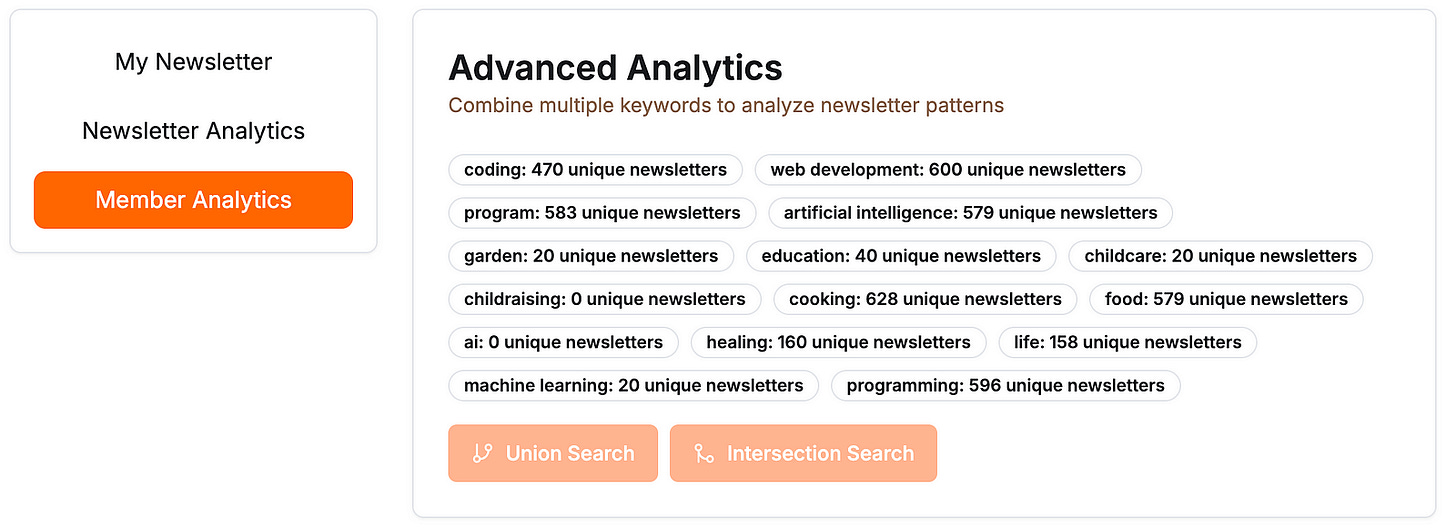
The dashboard has a left-right panel layout. Left panel: navigation and search. Right panel: the data view for whatever’s selected. Three main views:
Newsletter Analytics — subscriber distribution histogram, posting frequency chart, tier breakdown. This is the niche landscape view: what does this keyword’s ecosystem actually look like?
My Newsletter — search by subdomain to pull your own newsletter’s data. Shows your subscriber range, tier, age, and how you compare to the distribution for your keyword.

Member Analytics — the view I built primarily for my own use. Supports union search (keyword A OR keyword B — useful for finding adjacent niches) and intersection search (keyword A AND keyword B — narrows to newsletters covering both topics).
With Cursor (2025): I prompted each panel individually, describing the layout in plain English. Cursor generated the React components and I adjusted the data bindings.
With Claude Code today: The same but with persistent context — CLAUDE.md would hold the schema, the layout spec, and the Supabase table structure so every session starts informed. Much less re-explaining.
Step 6: Debug the Vercel Deployment Failure
This is the part the original article glossed over. It’s also the most useful part.
Everything worked in local development. I pushed to Vercel, shared the link, and the newsletter search returned empty results.
The symptom: API calls to Substack returned 200 responses but with empty publications arrays. No error, no timeout — just empty.
The cause: Substack rate-limits API calls from Vercel’s shared IP ranges. Multiple apps on the same Vercel infrastructure all share a small pool of outbound IPs. Substack sees high request volume from those IPs and quietly throttles them.
The same problem shows up in any deployed app that queries an external API from shared hosting. I ran into a version of this when the DeepSeek API went down mid-day on a live app — covered in When Your LLM API Goes Down: 6 Lessons From a Real Outage. The root cause is different but the lesson is the same: external API dependencies in the hot path break in ways that local testing never reveals.
The fix:
Move all Substack API calls out of the deployed app entirely. Run them locally via Python scripts, store results in Supabase, serve from Supabase. The deployed app never touches the Substack API.
This is Step 4 applied retroactively. If you’re building anything that queries a third-party API from a deployed app, make this decision before you deploy — not after.
What I’d Build Differently Today
I built this with Cursor in early 2025.
Three things that would change with Claude Code:
1. MCP for live data collection. Instead of running Python scripts locally and pushing to Supabase, I’d build an MCP server that queries the Substack API from a home server (fixed IP, no rate limiting). The best MCP servers setup covers the infrastructure pattern. The collection would be automated, not a manual script run.
2. CLAUDE.md for persistent project context. The schema, the 4 features, the Supabase table names — all of this would live in CLAUDE.md. Every Claude Code session would start with full project context instead of re-explaining the architecture. The Claude Code onboarding setup guide covers exactly how to structure these files so Claude picks them up without being told.
3. Skills for the repeating patterns. Fetching data from the API, normalizing it, upserting to Supabase — these are the same steps every time a new keyword gets added. A Claude Code skill would handle the whole flow with one command.
What hasn’t changed: the database-first design. Decouple collection from serving. Every data project I’ve built since has used the same pattern, and none of them have the rate-limiting problem.
The One Thing That Stuck
Build the tool for yourself first.
The Substack niche analyzer started because I needed it — not because I thought it would be a product. I needed to research my own niche, the manual process was slow, and automating it felt like the obvious next step.
The fact that other people found it useful came after. The fact that the requests-per-comment rate was high enough to push me toward building came after. The whole thing started as a personal tool that happened to be shareable.
Every useful tool I’ve built has followed the same sequence: personal problem → minimal solution → realized it was shareable → built it properly. Tools built the other way around — product first, personal use second — are the ones that don’t get finished. The builder doesn’t actually need them, so the motivation disappears the moment the build gets hard. What happens after you launch is the companion piece: the niche analyzer is the build, that article is what the real work looks like once you’ve shipped it.
Go Deeper
How to Research Substack Niche Competition With AI — this is the manual version of what the app automates. The analysis I ran on 1,200 newsletters that showed nearly half of “competition” had never published. Start here if you want to understand what the tool is measuring before you build it.
I Built an AI Research Tool to Study Substack Creators: What 3,000 Notes Show — the next layer of Substack analysis I built after this app. MCP-powered, pulls engagement patterns from creators you admire. Uses the same Substack data approach but at note-level granularity.
When Your LLM API Goes Down: 6 Lessons From a Real Outage — the Vercel rate-limiting bug in this build is a specific version of a general problem: external API dependencies break in production in ways local testing doesn’t catch. This article covers the same failure mode with a live LLM outage.